Totally made my day to see that Ashley of Cherished Bliss featured my sign.
This week- before Halloween is over, I am going to show you the pumpkins.
Dollar store pumpkins
Acrylic Paint-- French Gray Blue, White, Black, gold, brown
Paint brushes

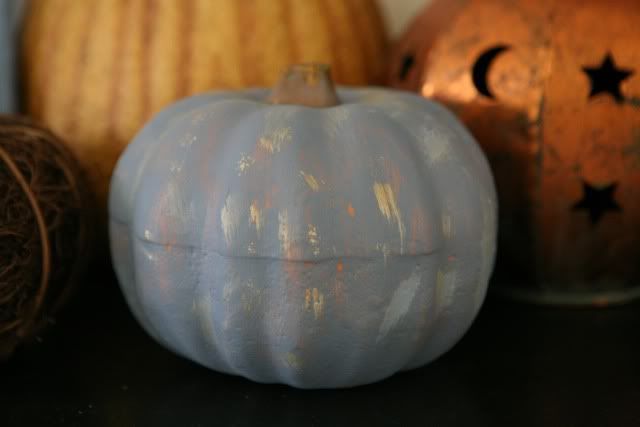
I painted the first pumpkin the French Gray blue color I am in love with lately. You do not have to worry about covering every little spot- in fact it is fine if a little orange shows through. There was some of the bright ugly orange on the stem- so I painted up the stem a tiny bit covering them with the the blue with a small brush.
I then took the brown and a small brush and painted the stem brown. I did not make a straight line across at the bottom of the stem but instead made it more jagged and natural looking.
I then dry brushed some splotches and streaks of gold all over the pumpkin. I espeically concentrated on the bumps of the pumpkin- but really just did it randomly. The key is to have a very dry brush with a tiny bit of gold on it. And the finished results.... You can see the orange peaking through at points but it works.
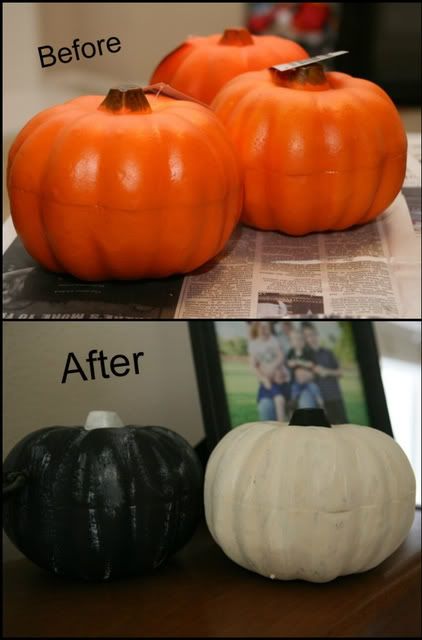
For the other two pumpkins I followed the same techniques, I painted one white- with a black stem- but it was too stark white for my taste, so I very lightly dry brushed steaks of black. The black pumpkin: I painted black, white stem, and dry brushed in a little more dramatic steaks of white.
Acrylic Paint-- French Gray Blue, White, Black, gold, brown
Paint brushes

I painted the first pumpkin the French Gray blue color I am in love with lately. You do not have to worry about covering every little spot- in fact it is fine if a little orange shows through.
 There was some of the bright ugly orange on the stem- so I painted up the stem a tiny bit covering them with the the blue with a small brush.
I then took the brown and a small brush and painted the stem brown. I did not make a straight line across at the bottom of the stem but instead made it more jagged and natural looking.
I then dry brushed some splotches and streaks of gold all over the pumpkin. I espeically concentrated on the bumps of the pumpkin- but really just did it randomly. The key is to have a very dry brush with a tiny bit of gold on it. And the finished results....
 You can see the orange peaking through at points but it works.
For the other two pumpkins I followed the same techniques, I painted one white- with a black stem- but it was too stark white for my taste, so I very lightly dry brushed steaks of black. The black pumpkin: I painted black, white stem, and dry brushed in a little more dramatic steaks of white.

So easy to do- and it only took me 30 minutes at most to do all three. I already had the paint and brushes so only cost me $3! Have you made any crafts lately?
I am linking this post up at the following crafting blogs


You made very chic pupmpkins!
ReplyDeleteAs usual, very impressive!
What fun pumpkins! I love those faux pumpkins that you can do just about anything with. I had no idea that they had them at the dollar store though - some of the stores charge an arm and a leg for them.
ReplyDeleteI have been crafting like a mad women because my ward asked me to do some crafts for our Holiday Craft Night. So I had to get samples ready this past week.
You'll see them on my blog in the future. :-D
Have a happy day!
Great job! I need to paint some things up....such a transformation!
ReplyDeleteVery cool!! The pumpkins look great.
ReplyDeleteThese are adorable!! Great job!
ReplyDeleteThanks for the shout out : )
These are GREAT!! I did try to craft recently and it never turns out like I would want it too - I think I am going to give up and just be happy for my friends (like you) who have the Martha Stewart gene.
ReplyDelete~Becca
Those are really great. I took the kids to a pumpkin patch yesterday and let them color and decorate them. It rained over night and now there pumpkins are plain again.
ReplyDeleteGirl I haven't crafted in ages! I bought stuff a while back to make a cute caddy for markers and crayons and such. Obviously I haven't done it. Your pumpkins are very cool and would cost way more than $3 for the finished product.
ReplyDeleteYou are such an awesome crafter. Love it.
ReplyDeleteThose turned out so good! I've really got to get my butt in gear and do some Halloween crafts!
ReplyDeleteThey look SO much cuter with your changes!! :)
ReplyDeleteMuch easier than I thought it was going to be!
ReplyDeleteYou know I what love most about this pumpkin craft is how unique it is. Everyone expects to see orange pumpkins being displayed so I love that you chose colors that stand out and aren't expected!
ReplyDeleteQuestion....how did you get your kids to leave you alone for an entire 30 minutes while you painted?? My kids would want to help and then they'd get paint everywhere and then I'd be beside myself cleaning up the huge mess!!
Love love love! So cheap and easy.... that's my kind of project!
ReplyDeleteI love that you did it for $3, that's my kind of crafting (wink)
ReplyDeleteVery fun. I should try and do something like this, my fall decor is sparse!
ReplyDeleteSuper cute!! Why can't I think of things like this on my own... you did good girl! :)
ReplyDeletehow cute and i love that everything came from the dollar store
ReplyDeleteVery cool, Emmy! Can't beat that price! And no, I haven't done anything crafty lately...
ReplyDeleteLOVE!!! Thanks for sharing!~
ReplyDeleteI love doing fall crafts! Cute idea!
ReplyDeleteWow! You make it sound so easy to do but I promise you, I could fail at this. I almost could swear that I would. No lie.
ReplyDeleteI hope they feature you again!
Can't believe those are from the dollar store. I like how you made them a little more chic. Very nice.
ReplyDeleteI love that you took a Dollar Store pumpkin and made it a little more chic and appealing. I need to get back on track with my crafts!
ReplyDeletewhat a cute idea! i love the $1 store, and i'm always looking for ideas to makeover things from there. thanks!
ReplyDelete-amber from defrumpme.com